Zur Druckansicht wechseln Visit the English version of this page

www.jb-electronics.de » Elektronik » Nixie-Röhren » Selbstgebaute Nixies » GL-LS-7

GL-LS-7

Das Glow Lamp Lab Sample 7, oder kurz GL-LS-7, ist eine von mehreren Glimmlampen aus der Doppelpunkt-Experiment-Reihe. Gefertigt wurde sie aus 9mm-Kalknatron-Glasrohr, Dumet-Draht für das Quetschsiegel, Nickel-Blech für die Kathoden und Edelstahldraht für die Anode. Sie wurde ursprünglich mit Luft bei 15mbar gefüllt:

GL-LS-7

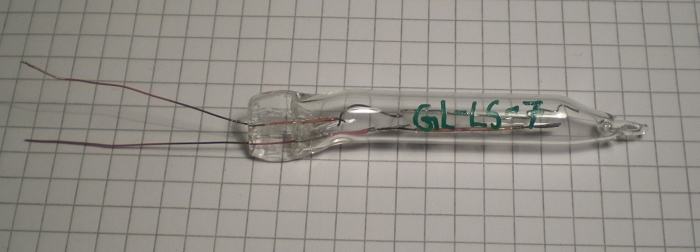
Wie zu erkennen ist, ist die GL-LS-7 leider am Vakuumsiegel geplatzt. Dennoch soll hier ihr Konstruktionsprozess vorgestellt werden.

Zunächst wurden mit einem handelsüblichen Locher zwei kreisförmige Stücke aus Nickel-Blech ausgestanzt:

Die Konstruktion der GL-LS-7

Diese wurden dann mit einem verglasten Dumet-Draht verbunden:

Die Konstruktion der GL-LS-7

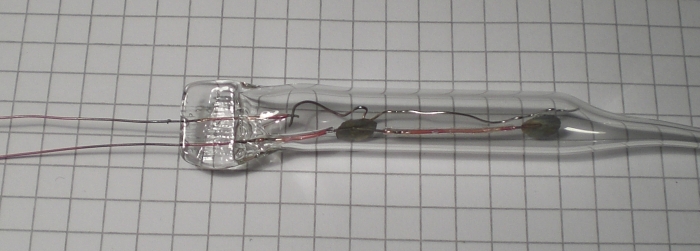
Dann wurde diese Konstruktion, die später die leuchtende Kathode darstellen sollte, mit der Anodenkonstruktion aus Edelstahl mit Hilfe von etwas Glas verbunden:

Die Konstruktion der GL-LS-7

Schließlich wurde die gesamte Konstruktion im vorverjüngten 9mm-Glasrohr untergebracht:

Die Konstruktion der GL-LS-7

Das Quetschsiegel war nicht auf Anhieb ein Erfolg; es ist zu erkennen, dass es auf folgendem Bild noch nicht dicht ist (siehe den oberen Teil):

Die Konstruktion der GL-LS-7

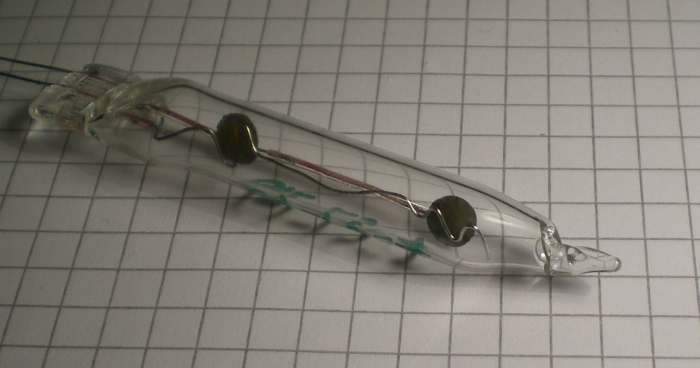
Doch mir fiel dieser Defekt auf, und nach vorsichtigem Aufwärmen gelang es mir, das Siegel erneut zu quetschen. Dieser Schritt ist bei Kalknatron-Glas alles andere als trivial, üblicherweise lässt sich diese Glassorte nur sehr schwierig wiederholt bearbeiten. Aber mit viel Vorsicht und ein bisschen Erfahrung, die ich ja schon im Bereich der Kalknatronglasbearbeitung sammeln konnte, funktionierte es hier dennoch.

Nach dem Evakuieren und anschließendem Befüllen mit Luft bei 15mbar ging jedoch beim Vakuumsiegel etwas schief: ich erhitzte die Röhre zu weit unten, wo das vorverjüngte Glas schon wieder zu weit auseinander war, sodass der Atmosphärendruck das Glas spannungsreif kollabieren ließ. Letztendlich zersprang das Vakuumsiegel während der Auskühlzeit und zerstörte so die Röhre. Hier ist der Siegelbruch sehr gut zu sehen:

Die defekte GL-LS-7

Doch selbst wenn das Siegel intakt geblieben wäre: die GL-LS-7 weist eine andere konzeptionelle Schwäche auf, die die gewollte Funktionalität so oder so beeinträchtigt hätte. Denn die beiden Punkt-Kathoden, die ja beide gleichzeitig leuchten sollen, sind parallel geschaltet. Nun ist es aber in Glimmlampen so, dass bei parallelgeschalteten aber unverbundenen Kathoden das Glimmen meistens zu der Kathode springt, die einen winzigen Bruchteil näher an der Anode liegt. Unverbunden meint in diesem Kontext, dass die beiden Kathoden im Betrieb nicht mit einem gemeinsamen Glimmschlauch bedeckt sind. Das ist nicht immer der Fall, manchmal leuchtet auch die andere Kathode; aber das stabile Ansteuern beider Kathoden über einen Draht ist fast unmöglich.

Woher weiß ich das, funktioniert die GL-LS-7 ja nicht? Ganz einfach: von der GL-LS-8, die eine fast identische interne Konstruktion aufweist.

Nach oben

show print layout Die deutsche Version der Seite besuchen

www.jb-electronics.de » Electronics » Nixie Tubes » Handcrafted Nixie tubes » GL-LS-7

GL-LS-7

The Glow Lamp Lab Sample 7, or in short GL-LS-7, is one out of several glow lab experiments concerning colon tubes. She has been made out of 9mm soda lime tubing, Dumet wire for the pinch seal, nickel sheet for the cathodes and stainless steel wire for the anode; the intended atmosphere was air at 15mbar:

GL-LS-7

As can be seen, the GL-LS-7 cracked at the vacuum seal. However, the detailed construction of the interior electrode structure will be presented here anyway.

First of all, using a standard hole puncher, two circular pieces of nickel sheet were obtained:

The construction of the GL-LS-7

These were then connected by a glazed Dumet wire:

The construction of the GL-LS-7

This construction - which was intended to be the glowing cathode in shape of two glowing dots - was joined to the stainless steel anode construction using a few drops of glass:

The construction of the GL-LS-7

Finally, this construction was placed in pre-thinned 9mm glass tubing:

The construction of the GL-LS-7

The pinch seal was no success at my first attempt; in the following picture it is quite evident that it is not yet airtight (see the upper part):

The construction of the GL-LS-7

However, I realised this in time, and after cautious reheating I managed to re-pinch the seal. This procedure is by no means trivial because soda lime glass has the tendency to crack when reheated too rapidly. But due to some experience I could already gain in the handling of soda lime glass it worked nevertheless.

After evacuation and filling of the tube with air up to 15mbar something went wrong with the vacuum seal: I heated the tube to far away from the thinned out neck, such that the ambient air pressure pushed the glass together too violently, resulting in large residual tensions after cool off. That is why during cool off time the seal eventually cracked, thus destroying the tube. Here you can see the cracked seal:

The defective GL-LS-7

But even if the seal had worked out fine, the GL-LS-7 has another conceptional weakness that would have made it impossible for her to work properly. The two circular cathodes have been internally wired in parallel. While this sounds like a mere technicality, for glow lamps it is a critical step, because in case of disjoint cathodes the glowing will mostly stick to the respective cathode where the distance to the anode is the smallest. In this context, disjoint means that the cathodes are connected electrically, but when ignited they are not connected by glowing gas. Sometimes, however, the glowing switches to a different cathode, but this is rather rare. In short: the stable driving of two internally paralleled disjoint cathodes is nearly impossible.

But how can I tell, the GL-LS-7 is broken? That is easy to answer: the GL-LS-8 uses a very similar internal construction.

To the top